2025. 2. 23. 01:48ㆍDevops/Istio
SNI(Server Name Indication)는 TLS 핸드셰이크 과정에서 클라이언트가 접속하려는 도메인 이름을 명시하는 기능입니다.
Istio에서는 이를 활용하여 도메인 기반의 트래픽 라우팅을 설정할 수 있습니다.
(SNI에 대한 관련사항은 자세히 다루지는 않습니다.. 참고를 https://www.cloudflare.com/ko-kr/learning/ssl/what-is-sni/ 하면 좋을듯합니다.. )
기본적으로 Istio의 Gateway는 Host 헤더 기반의 HTTP 라우팅을 수행하지만, TLS 트래픽의 경우 SNI를 활용하여 특정 서비스로 라우팅할 수도 있습니다. 이는 멀티 테넌트 환경에서 특정 도메인별로 트래픽을 라우팅하거나, 특정 클러스터로 트래픽을 분산할 때 유용합니다. 또한 이런 방식은 한 IP에 여러 호스트를 매칭시키기 때문에 참여의 어플리케이션 개수도 늘릴수 있습니다.
한마디로 한 IP와 특정 TCP PORT로 오는 HOST를 Routing 한다 생각하면 쉬울수도..?
그리하여 이번엔 SNI를 관련된 트래픽 라우팅에 대해 인증서 만들고 파드도 배포하며 직접 확인해봅니다.
0. 예시 인증서 만들기
인증서는 selfsigned로 만든 CA인증서를 활용합니다. 그후 그 CA인증서로
swlee.example.com과 swlee2.example.com 두개의 인증서를 만들어서 진행합니다.
- ca인증서 만들기
# CA 개인키 생성
openssl genpkey -algorithm RSA -out ca.key -pkeyopt rsa_keygen_bits:2048

# CA 인증서 생성 (자체서명) 10년으로 만듬
openssl req -x509 -new -nodes -key ca.key -sha256 -days 3650 -out ca.crt -subj "/CN=MySelfSignedCA"

$ ls
ca.crt ca.key
- 서버용 인증서 만들기 (도메인용)
# swlee.example.com 인증서만들기
## 개인키생성
$ openssl genpkey -algorithm RSA -out swlee.key -pkeyopt rsa_keygen_bits:2048
## 인증서 서명
$ openssl req -new -key swlee.key -out swlee.csr -subj "/CN=swlee.example.com"
## 자체서명 인증서 만들기
$ openssl x509 -req -in swlee.csr -CA ca.crt -CAkey ca.key -CAcreateserial -out swlee.crt -days 365 -sha256


# swlee2.example.com 인증서만들기
## 개인키생성
$ openssl genpkey -algorithm RSA -out swlee2.key -pkeyopt rsa_keygen_bits:2048
## 인증서 서명
$ openssl req -new -key swlee2.key -out swlee2.csr -subj "/CN=swlee2.example.com"
## 자체서명 인증서 만들기
$ openssl x509 -req -in swlee2.csr -CA ca.crt -CAkey ca.key -CAcreateserial -out swlee2.crt -days 365 -sha256
$ ls
ca.crt ca.key swlee.crt  swlee.csr  swlee.key  swlee2.crt  swlee2.csr  swlee2.key
- 인증서 체인 만들기
클라이언트가 루트 CA는 신뢰하지만 서버 인증서와는 직접 연결하지않기때문에 중간 CA를 만들어줘야합니다.
브라우저에서 만약에 신뢰 할 수 없는 인증서 오류를 방지하려면 ca-chain.crt( 중간 + 루트 ) 인증서를 함께 제공해야 합니다. 인증서 체인을 만드는이유는 curl을 통한 TEST를 하기 위해 만듭니다..
# swlee.example.com 용 chain 생성
$ cat swlee.crt ca.crt > ca-chain.cert

# swlee2.example.com 용 chain 생성
$ cat swlee2.crt ca.crt > ca-chain2.cert
이후 TLS 커넥션을 마지막으로 종료할 Service에 배포할 Secret을 배포해줘야합니다.
$ kubectl create secret tls swlee.example.com \
--key ./swlee.key  \
--cert ./swlee.crt
secret/swlee.example.com created
$ kubectl get secrets
NAME                TYPE                DATA   AGE
swlee.example.com   kubernetes.io/tls   2      3s


$ kubectl create secret tls swlee2.example.com \
--key ./swlee2.key  \
--cert ./swlee2.crt
secret/swlee2.example.com created
$ kubectl get secrets
NAME                 TYPE                DATA   AGE
swlee.example.com    kubernetes.io/tls   2      63s
swlee2.example.com   kubernetes.io/tls   2      18s
1. Istio에서 SNI 기반 트래픽 라우팅 적용 방법
1.0. application 설치와 Ingerss Gateway에 TCP추가하기
먼저 Test를 위해 간단한 application을 배포합니다. 앱은 swlee.example.com과 swlee2.example.com에 사용할 앱 2개를 배포하여 진행합니다.
여기서 중요한것은 SNI에 대한 TLS 종료는 백엔드에서 한다는 점이기에 백엔드로 배포되는 서비스에 위에서만든 인증서를 꼭 마운트를 해줘야 한다는 점입니다.
- swlee.example.com 배포
---
apiVersion: v1
kind: Service
metadata:
  labels:
    app: swlee-example-1
  name: swlee-example-1
spec:
  ports:
  - name: https
    port: 80
    protocol: TCP
    targetPort: 8080
  selector:
    app: swlee-example-1
---
apiVersion: apps/v1
kind: Deployment
metadata:
  labels:
    app: swlee-example-1
  name: swlee-example-1
spec:
  replicas: 1
  selector:
    matchLabels:
      app: swlee-example-1
  template:
    metadata:
      labels:
        app: swlee-example-1
    spec:
      containers:
      - env:
        - name: "LISTEN_ADDR"
          value: "0.0.0.0:8080"
        - name: "SERVER_TYPE"
          value: "http"
        - name: "TLS_CERT_LOCATION"
          value: "/etc/certs/tls.crt"
        - name: "TLS_KEY_LOCATION"
          value: "/etc/certs/tls.key"
        - name: "NAME"
          value: "swlee-example-1"
        - name: "MESSAGE"
          value: "Hello from swlee-example-1!!!"
        - name: KUBERNETES_NAMESPACE
          valueFrom:
            fieldRef:
              fieldPath: metadata.namespace
        image: nicholasjackson/fake-service:v0.14.1
        imagePullPolicy: IfNotPresent
        name: swlee-example
        ports:
        - containerPort: 8080
          name: http
          protocol: TCP
        securityContext:
          privileged: false
        volumeMounts:
        - mountPath: /etc/certs
          name: tls-certs
      volumes:
      - name: tls-certs
        secret:
          secretName: swlee.example.com
- swlee2.example.com 배포
---
apiVersion: v1
kind: Service
metadata:
  labels:
    app: swlee-example-2
  name: swlee-example-2
spec:
  ports:
  - name: https
    port: 80
    protocol: TCP
    targetPort: 8080
  selector:
    app: swlee-example-2
---
apiVersion: apps/v1
kind: Deployment
metadata:
  labels:
    app: swlee-example-2
  name: swlee-example-2
spec:
  replicas: 1
  selector:
    matchLabels:
      app: swlee-example-2
  template:
    metadata:
      labels:
        app: swlee-example-2
    spec:
      containers:
      - env:
        - name: "LISTEN_ADDR"
          value: "0.0.0.0:8080"
        - name: "SERVER_TYPE"
          value: "http"
        - name: "TLS_CERT_LOCATION"
          value: "/etc/certs/tls.crt"
        - name: "TLS_KEY_LOCATION"
          value: "/etc/certs/tls.key"
        - name: "NAME"
          value: "swlee-example-2"
        - name: "MESSAGE"
          value: "Hello from swlee-example-2!!!"
        - name: KUBERNETES_NAMESPACE
          valueFrom:
            fieldRef:
              fieldPath: metadata.namespace
        image: nicholasjackson/fake-service:v0.14.1
        imagePullPolicy: IfNotPresent
        name: swlee-example
        ports:
        - containerPort: 8080
          name: http
          protocol: TCP
        securityContext:
          privileged: false
        volumeMounts:
        - mountPath: /etc/certs
          name: tls-certs
      volumes:
      - name: tls-certs
        secret:
          secretName: swlee2.example.com
해당 yaml을 kubernete에 배포합니다. 꼭 tls인증서를 매칭하여 배포해야 정상작동됩니다!!
이후 배포가완료되면 TCP라우팅을 위한 ingress-gateway에 TCP를 추가합니다.
이번 글에서는 31000을 오픈하여 SNI 호스트네임에 따른 TCP라우팅이 되도록 합니다.
이후.. patch명령을 통해 Istio IngressGateway service에 TCP port를 추가해줍니다.
( ※ 참고 : NodePort를 사용시에는 Nodeport도 명시하여 노출시켜줘야합니다.)
# 31000 포트 추가
$ kubectl patch svc istio-ingressgateway -n istio-system --type='json' -p '[
  {
    "op": "add",
    "path": "/spec/ports/0",
    "value": {
      "name": "tcp-31000",
      "protocol": "TCP",
      "port": 31000,
      "targetPort": 31000
    }
  }
]'
service/istio-ingressgateway patched
# 31000포트 확인
$ k get svc -n istio-system istio-ingressgateway -o jsonpath='{.spec.ports[?(@.name =="tcp-31000")]}'
{"name":"tcp-31000","nodePort":32287,"port":31000,"protocol":"TCP","targetPort":31000}
1.1. Istio Gateway 에 설정
이제부터 Gateway을 통해 SNI를 설정합니다.
Gateway에서는 SNI 헤더를 살펴보고 트래픽을 특정 백엔드로 라우팅 하는 일을 합니다. 라우팅 메커니즘은 passthrough를 사용합니다. 여기서 중요한것은.. TLS의 종료는 백엔드에서 해야한다는 점입니다. 그렇기에 원래라면 TLS설정은 Gateway에 하지만.. SNI는 Gateway에 TLS설정을 하지않습니다. 먼저 Gateway를 배포해봅니다.
apiVersion: networking.istio.io/v1alpha3
kind: Gateway
metadata:
  name: sni-passthrough-gateway
spec:
  selector:
    istio: ingressgateway
  servers:
  - port:
      number: 31000
      name: tcp-sni-1
      protocol: TLS
    hosts:
    - "swlee.example.com"
    tls:
      mode: PASSTHROUGH
  - port:
      number: 31000
      name: tcp-sni-2
      protocol: TLS
    hosts:
    - "swlee2.example.com"
    tls:
      mode: PASSTHROUGH
1.2. Virtualservcie 배포
마지막으로 virtualservice을 배포하여 트래픽 라우팅을 진행해봅시다.
virtualservice은 위와 달리 두가지로 (swlee.example.com 과 swlee2.example.com) 배포해봅니다. 두가지로 하는 이유는 gateway를 하나로 배포했기 때문입니다.
- swlee.example.com (virutalservice 배포)
apiVersion: networking.istio.io/v1alpha3
kind: VirtualService
metadata:
  name: swlee.example.com
spec:
  hosts:
  - "swlee.example.com"
  gateways:
  - sni-passthrough-gateway
  tls:
  - match:
    - port: 31000
      sniHosts:
      - swlee.example.com
    route:
    - destination:
        host: swlee-example-1
        port:
number: 80- swlee2.example.com (virutalservice 배포)
apiVersion: networking.istio.io/v1alpha3
kind: VirtualService
metadata:
  name: swlee2.example.com
spec:
  hosts:
  - "swlee2.example.com"
  gateways:
  - sni-passthrough-gateway
  tls:
  - match:
    - port: 31400
      sniHosts:
      - swlee2.example.com
    route:
    - destination:
        host: swlee-example-2
        port:
          number: 80
gateways는 위에 배포한 sni-passthrough-gateway로 명시해준다.
그리고 hosts는 각각 virtauservice에 할당되는 호스트를 하나씩 입력해줘야한다.
마지막으로 sniHosts는 hosts에 명시된 Name을 넣어줘야한다.
2. 결과 확인해보기
2-0. 배포된 서비스 확인
# gateway
$ k get gateways.networking.istio.io
NAME                      AGE
sni-passthrough-gateway   8m40s

# virtualService
$ k get virtualservices.networking.istio.io
NAME                  GATEWAYS                      HOSTS                    AGE
swlee.example.com     ["sni-passthrough-gateway"]   ["swlee.example.com"]    3s
swlee2.example.com    ["sni-passthrough-gateway"]   ["swlee2.example.com"]   2m50s
2-1. 서비스 호출
호출전에 swlee.example.com과 swlee.example.com 을 /etc/hosts에 ingressgateway 의 IP를 넣어두 되고
없다면 --resolve를 사용하여 호출하여도 됩니다.
- swlee.example.com 호출 결과
$ curl -H "Host: swlee.example.com" https://swlee.example.com:31000  \
--cacert ca-chain.cert\
--resolve swlee.example.com:31000:localhost

- swlee2.example.com 호출 결과
$ curl -H "Host: swlee2.example.com" https://swlee2.example.com:31000  \
--cacert ca-chain2.cert\
--resolve swlee.example2.com:31000:localhost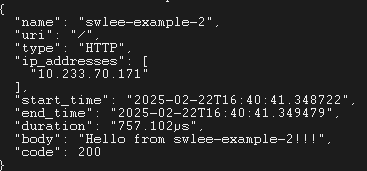
결과는 이와같다.. 한 IP와 PORT를 통해 SNI를 활용하여 특정 서비스로 라우팅이 되는걸 볼수 있습니다.
3. 정리
http를통한 tls은 gateway에 인증서를 넣고 앞에서 처리한다면 SNI는 back단에서 인증처리를 종료해야한다는 점을 알았다. sni를 사실 잘사용해본적이 없었는데 이번기회에 알게되어서 나중에 기회 될 때는 잘 쓸 수 있을거같다.
'Devops > Istio' 카테고리의 다른 글
| Istio AuthorizationPolicy 이해해보기 (0) | 2025.03.25 |
|---|---|
| Istio Gateway vs Gateway API (0) | 2025.03.14 |
| Istio DestinationRule 이해하기 (0) | 2025.03.07 |
| Istio의 Gateway와 VirtualService 이해하기 (0) | 2025.02.20 |
| EnvoyFilter를 이용한 Header Remove (0) | 2025.02.07 |